Increase conversion
Monitoring- and Analytictools like Google Analytics are great things to optimize your E-commerce system to sale more of your products.But, wouldn't it be great to interact with the user right in the situation, when he is leaving the direct way to the checkout and maybe changing his mind?
To guide the user back on the way to a sale you can for example apply a exclusive discount or put a free product to is cart - event based and automatically.
How to setup an event based sales rule
First off, you'll need to download the latest Notify module for Magento here: https://grafzahl.io/notify-module/Now you are able to go through the easy install process, which is explained here: https://documentation.grafzahl.io/notify-module/doc/install-setup.html
At this point, we are very close to our goal.
Create a new notification
General settings
To do that, click on your Notify menu in the main navigation of your Adminpanel.Now you'll see the common Magento grid where you can add a new Item with the upper right "New"-Button.
This page will load:
 | |||
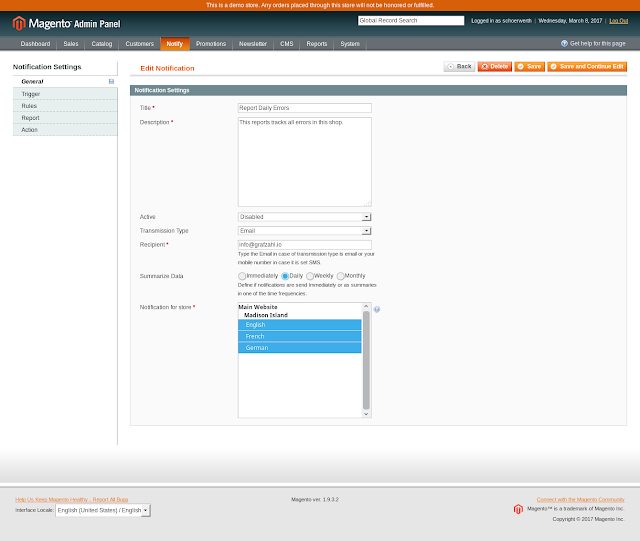
| The Notify Configuration Item in the Magento Adminpanel. "General"-Tab. |
Fill your Title and Description. These fields are not used for technical purpose. They are only for you to identify the notifications.
The switch "Active" is self-explaining. The transmission type defines, how your notifications or reports are send to you. The default is Email. More transmission types like Slack, SMS or Logfile are on our Todo-List.
The summary type option will give you the possibility to summarize any of the recorded issues of this notification:
- Immediately: The issue will be sent immediately as it is recorded. The Report configuration will offer you Text-Templates to define the message which is composed for the specific issue.
- Daily, Weekly, Monthly: The issues of every defined event-trigger will be summarized and reported in the selected frequence. The Report configuration will offer you different elements which you can configure to compose the collected data in any way you would like to see the issues.
Click Immediately here, to get notified immediately. This also is an indication for you, that your sales rule has been applied.
With the Store Multiselect field you can decide, in which shops this notification item is valid and collects issues.
Trigger selection
The trigger selection looks like this: |
| The Notify Event-Trigger Selection. The left column contains all Areas. When you click on an Area, the second column will list all available Event-Triggers for that Area. |
You can select from some defined Trigge-Events that are available for Notify. The name of them are describing most likely when they are triggered and therefor creating a new issue.
The Trigger are devided into Areas. They are explaining where this Event will trigger, like "Admin Panel".
When you click on one of the Areas, you will get a list of all available Events in the second column.
Clicking on one of them will add it to the right column. This indicates that it is selected for your Notification.
We want to apply a sales rule, when the customer opens a 404-Page. Therefor we select "Error" and "User gets 404 page" to get notified every time a customer opens a URL in our online store which does not exists.
To go on with the Rule Conditions and Report Configuration you'll need to save the Notification by now. This enables the Trigger selection and reveal the fields for the Triggers in the next Tabs.
Rules configuration
This Tab will let you filter the issues on information that is available in the situation of the issue. At the moment there are no filter options for the 404-Error-Trigger. So we can skip that.Report settings
This is where you define what is reported in case of an issue. You will see a Textarea field with available Placeholders on the right. You can type any text you like and add those placeholders to create a message that is most informative for you. |
| Define your message for that Issue and fill it with the available Placeholders on the right. Click "Save Template" to submit the Template text. Then click "Save and Continue Edit". |
Define the automated Action
This configuration is the most interesting. Here you can define what will happen if the issue was reported.You will get the form above, if you enable the switch on the right. Select the option "Apply a sales rule" on the left side of the form.
In the loaded options on the right, select the sales rule which should be applied to the customers cart after he got a 404 Page.
Now you are ready.

No comments:
Post a Comment